1.简介
想必每个入了门的Android开发者都多少对EventBus有过了解,EventBus是一个Android事件发布/订阅框架,通过解耦发布者和订阅者简化 Android 事件传递。EventBus使用简单,并将事件发布和订阅充分解耦,从而使代码更简洁。一直以来很受开发者的欢迎,截止到目前EventBus的安装量已经超过一亿次。足以看出EventBus有多么的优秀。
目前网上已经有不少优秀的EventBus的源码分析文章,我也一直在犹豫要不要再写一次,一方面是因为最近EventBus刚好更新了3.0版本,事件的订阅已经从方法名换成了注解的方式,而且整体还是有不少变化。另外一方面也是为了自己学习。毕竟写出来会有更深层次的理解。好了,下面让我们看看3.0版本EventBus的使用方法.
2.使用方法
2.1注册订阅者
首先我们需要将我们希望订阅事件的类,通过EventBus类注册,注册代码如下:
1 | //3.0版本的注册 |
可以看到2.x版本中有四种注册方法,区分了普通注册和粘性事件注册,并且在注册时可以选择接收事件的优先级,这里我们就不对2.x版本做过多的研究了,如果想研究可以参照此篇文章.由于3.0版本将粘性事件以及订阅事件的优先级换了一种更好的实现方式,所以3.0版本中的注册就变得简单,只有一个register()方法即可.
2.2编写响应事件订阅方法
注册之后,我们需要编写响应事件的方法,代码如下:
1 | //3.0版本 |
在2.x版本中只有通过onEvent开头的方法会被注册,而且响应事件方法触发的线程通过onEventMainThread或onEventBackgroundThread这些方法名区分,而在3.0版本中.通过@Subscribe注解,来确定运行的线程threadMode,是否接受粘性事件sticky以及事件优先级priority,而且方法名不在需要onEvent开头,所以又简洁灵活了不少.
2.3发送事件
我们可以通过EventBus的post()方法来发送事件,发送之后就会执行注册过这个事件的对应类的方法.或者通过postSticky()来发送一个粘性事件.在代码是2.x版本和3.0版本是一样的.
1 | EventBus.getDefault().post("str"); |
2.4解除注册
当我们不在需要接收事件的时候需要解除注册unregister,2.x和3.0的解除注册也是相同的.代码如下:1
EventBus.getDefault().unregister(this);
3.类关系图
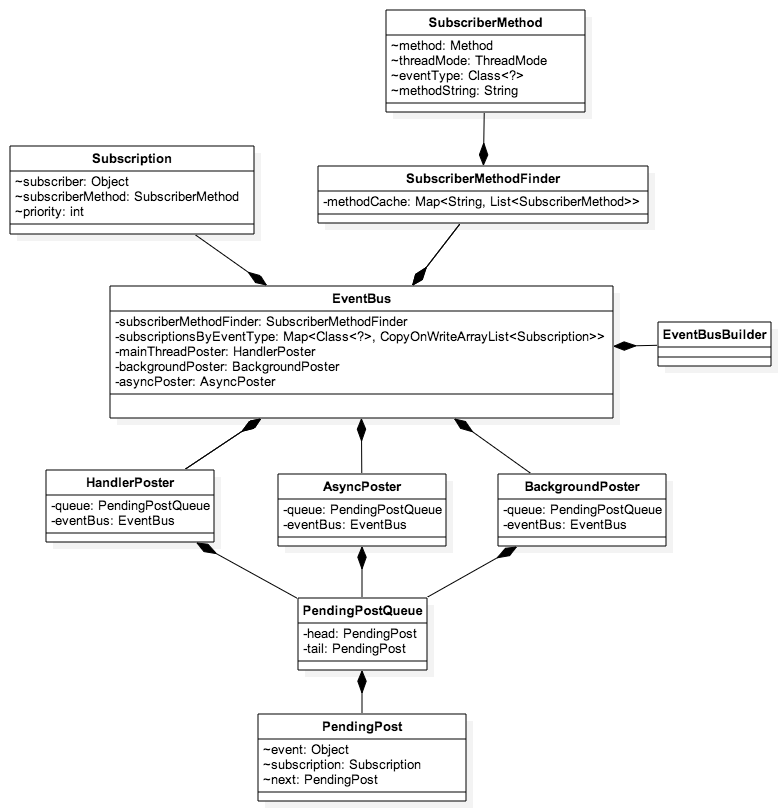
类关系图我直接引用了CodeKK的EventBus源代码分析,
虽然更新了3.0,但是整体上的设计还是可以用上面的类图来分析,从类图上我们可以看到大部分类都是依赖于EventBus的,上部分主要是订阅者相关信息,中间是 EventBus 类,
下面是发布者发布事件后的调用。下面我们来进行源码分析.
4.源码分析
这一节我们通过EventBus的使用流程来分析它的调用流程,通过我们熟悉的使用方法来深入到EventBus的实现内部并理解它的实现原理.
4.1创建EventBus
一般情况下我们都是通过EventBus.getDefault()获取到EventBus对象,从而在进行register()或者post()等等,所以我们看看getDefault()方法的实现:1
2
3
4
5
6
7
8
9
10public static EventBus getDefault() {
if (defaultInstance == null) {
synchronized (EventBus.class) {
if (defaultInstance == null) {
defaultInstance = new EventBus();
}
}
}
return defaultInstance;
}
这里就是设计模式里我们常用的单例模式了,目的是为了保证getDefault()得到的都是同一个实例。如果不存在实例,就调用了EventBus的构造方法:1
2
3
4
5
6
7
8
9
10
11
12
13
14
15
16
17
18
19
20
21
22
23
24
25
26
27
28
29
30
31
32
33
34
35private static final EventBusBuilder DEFAULT_BUILDER = new EventBusBuilder();
public EventBus() {
this(DEFAULT_BUILDER);
}
EventBus(EventBusBuilder builder) {
//key:订阅的事件,value:订阅这个事件的所有订阅者集合
//private final Map<Class<?>, CopyOnWriteArrayList<Subscription>> subscriptionsByEventType;
subscriptionsByEventType = new HashMap<>();
//key:订阅者对象,value:这个订阅者订阅的事件集合
//private final Map<Object, List<Class<?>>> typesBySubscriber;
typesBySubscriber = new HashMap<>();
//粘性事件 key:粘性事件的class对象, value:事件对象
//private final Map<Class<?>, Object> stickyEvents;
stickyEvents = new ConcurrentHashMap<>();
//事件主线程处理
mainThreadPoster = new HandlerPoster(this, Looper.getMainLooper(), 10);
//事件 Background 处理
backgroundPoster = new BackgroundPoster(this);
//事件异步线程处理
asyncPoster = new AsyncPoster(this);
indexCount = builder.subscriberInfoIndexes != null ? builder.subscriberInfoIndexes.size() : 0;
//订阅者响应函数信息存储和查找类
subscriberMethodFinder = new SubscriberMethodFinder(builder.subscriberInfoIndexes,
builder.strictMethodVerification, builder.ignoreGeneratedIndex);
logSubscriberExceptions = builder.logSubscriberExceptions;
logNoSubscriberMessages = builder.logNoSubscriberMessages;
sendSubscriberExceptionEvent = builder.sendSubscriberExceptionEvent;
sendNoSubscriberEvent = builder.sendNoSubscriberEvent;
throwSubscriberException = builder.throwSubscriberException;
//是否支持事件继承
eventInheritance = builder.eventInheritance;
executorService = builder.executorService;
}
可以看出是通过初始化了一个EventBusBuilder()对象来分别初始化EventBus的一些配置,当我们在写一个需要自定义配置的框架的时候,这种实现方法非常普遍,将配置解耦出去,使我们的代码结构更清晰.注释里我标注了大部分比较重要的对象,这里没必要记住,看下面的文章时如果对某个对象不了解,可以再回来看看.
4.2注册过程源码分析
4.2.1 register()方法的实现
3.0的注册只提供一个register()方法了,所以我们先来看看register()方法做了什么:1
2
3
4
5
6
7
8
9
10
11
12
13
14public void register(Object subscriber) {
//首先获得订阅者的class对象
Class<?> subscriberClass = subscriber.getClass();
//通过subscriberMethodFinder来找到订阅者订阅了哪些事件.返回一个SubscriberMethod对象的List,SubscriberMethod
//里包含了这个方法的Method对象,以及将来响应订阅是在哪个线程的ThreadMode,以及订阅的事件类型eventType,以及订阅的优
//先级priority,以及是否接收粘性sticky事件的boolean值.
List<SubscriberMethod> subscriberMethods = subscriberMethodFinder.findSubscriberMethods(subscriberClass);
synchronized (this) {
for (SubscriberMethod subscriberMethod : subscriberMethods) {
//订阅
subscribe(subscriber, subscriberMethod);
}
}
}
可以看到register()方法很简洁,代码里的注释也很清楚了,我们可以看出通过subscriberMethodFinder.findSubscriberMethods(subscriberClass)方法就能返回一个SubscriberMethod的对象,而SubscriberMethod里包含了所有我们需要的接下来执行subscribe()的信息.所以我们先去看看findSubscriberMethods()是怎么实现的,然后我们再去关注subscribe()。
4.2.2 SubscriberMethodFinder的实现
一句话来描述SubscriberMethodFinder类就是用来查找和缓存订阅者响应函数的信息的类。所以我们首先要知道怎么能获得订阅者响应函数的相关信息。在3.0版本中,EventBus提供了一个EventBusAnnotationProcessor注解处理器来在编译期通过读取@Subscribe()注解并解析,处理其中所包含的信息,然后生成java类来保存所有订阅者关于订阅的信息,这样就比在运行时使用反射来获得这些订阅者的信息速度要快.我们可以参考EventBus项目里的EventBusPerformance这个例子,编译后我们可以在build文件夹里找到这个类,MyEventBusIndex 类,当然类名是可以自定义的.我们大致看一下生成的MyEventBusIndex类是什么样的:
1 | /** |
可以看出是使用一个静态HashMap即:SUBSCRIBER_INDEX来保存订阅类的信息,其中包括了订阅类的class对象,是否需要检查父类,以及订阅方法的信息SubscriberMethodInfo的数组,SubscriberMethodInfo中又保存了,订阅方法的方法名,订阅的事件类型,触发线程,是否接收sticky事件以及优先级priority.这其中就保存了register()的所有需要的信息,如果再配置EventBus的时候通过EventBusBuilder配置:eventBus = EventBus.builder().addIndex(new MyEventBusIndex()).build();来将编译生成的MyEventBusIndex配置进去,这样就能在SubscriberMethodFinder类中直接查找出订阅类的信息,就不需要再利用注解判断了,当然这种方法是作为EventBus的可选配置,SubscriberMethodFinder同样提供了通过注解来获得订阅类信息的方法,下面我们就来看findSubscriberMethods()到底是如何实现的:
1 | List<SubscriberMethod> findSubscriberMethods(Class<?> subscriberClass) { |
注释很详细我们就不在多说,由于篇幅原因我们就不在分析findUsingInfo()方法,其无非就是通过查找我们上面所说的MyEventBusIndex类中的信息,来转换成List<SubscriberMethod>从而获得订阅类的相关订阅函数的各种信息.有兴趣的可以自己研究看看,下面我们就来看findUsingReflection()方法是如何实现的:1
2
3
4
5
6
7
8
9
10
11
12
13private List<SubscriberMethod> findUsingReflection(Class<?> subscriberClass) {
//FindState 用来做订阅方法的校验和保存
FindState findState = prepareFindState();
findState.initForSubscriber(subscriberClass);
while (findState.clazz != null) {
//通过反射来获得订阅方法信息
findUsingReflectionInSingleClass(findState);
//查找父类的订阅方法
findState.moveToSuperclass();
}
//获取findState中的SubscriberMethod(也就是订阅方法List)并返回
return getMethodsAndRelease(findState);
}
这里通过FindState类来做订阅方法的校验和保存,并通过FIND_STATE_POOL静态数组来保存FindState对象,可以使FindState复用,避免重复创建过多的对象.最终是通过findUsingReflectionInSingleClass()来具体获得相关订阅方法的信息的:
1 | private void findUsingReflectionInSingleClass(FindState findState) { |
这里走完,我们订阅类的所有SubscriberMethod都已经被保存了,最后再通过getMethodsAndRelease()返回List<SubscriberMethod>至此,所有关于如何获得订阅类的订阅方法信息即:SubscriberMethod对象就已经完全分析完了,下面我们来看subscribe()是如何实现的.
4.2.3 subscribe()方法的实现
好的,这里我们回到4.2.1的subscribe(subscriber, subscriberMethod);中去,通过这个方法,我们就完成了注册,下面看一下subscribe()的实现:1
2
3
4
5
6
7
8
9
10
11
12
13
14
15
16
17
18
19
20
21
22
23
24
25
26
27
28
29
30
31
32
33
34
35
36
37
38
39
40
41
42
43
44
45
46
47
48
49
50
51
52
53
54//必须在同步代码块里调用
private void subscribe(Object subscriber, SubscriberMethod subscriberMethod) {
//获取订阅的事件类型
Class<?> eventType = subscriberMethod.eventType;
//创建Subscription对象
Subscription newSubscription = new Subscription(subscriber, subscriberMethod);
//从subscriptionsByEventType里检查是否已经添加过该Subscription,如果添加过就抛出异常
CopyOnWriteArrayList<Subscription> subscriptions = subscriptionsByEventType.get(eventType);
if (subscriptions == null) {
subscriptions = new CopyOnWriteArrayList<>();
subscriptionsByEventType.put(eventType, subscriptions);
} else {
if (subscriptions.contains(newSubscription)) {
throw new EventBusException("Subscriber " + subscriber.getClass() + " already registered to event "
+ eventType);
}
}
//根据优先级priority来添加Subscription对象
int size = subscriptions.size();
for (int i = 0; i <= size; i++) {
if (i == size || subscriberMethod.priority > subscriptions.get(i).subscriberMethod.priority) {
subscriptions.add(i, newSubscription);
break;
}
}
//将订阅者对象以及订阅的事件保存到typesBySubscriber里.
List<Class<?>> subscribedEvents = typesBySubscriber.get(subscriber);
if (subscribedEvents == null) {
subscribedEvents = new ArrayList<>();
typesBySubscriber.put(subscriber, subscribedEvents);
}
subscribedEvents.add(eventType);
//如果接收sticky事件,立即分发sticky事件
if (subscriberMethod.sticky) {
//eventInheritance 表示是否分发订阅了响应事件类父类事件的方法
if (eventInheritance) {
// Existing sticky events of all subclasses of eventType have to be considered.
// Note: Iterating over all events may be inefficient with lots of sticky events,
// thus data structure should be changed to allow a more efficient lookup
// (e.g. an additional map storing sub classes of super classes: Class -> List<Class>).
Set<Map.Entry<Class<?>, Object>> entries = stickyEvents.entrySet();
for (Map.Entry<Class<?>, Object> entry : entries) {
Class<?> candidateEventType = entry.getKey();
if (eventType.isAssignableFrom(candidateEventType)) {
Object stickyEvent = entry.getValue();
checkPostStickyEventToSubscription(newSubscription, stickyEvent);
}
}
} else {
Object stickyEvent = stickyEvents.get(eventType);
checkPostStickyEventToSubscription(newSubscription, stickyEvent);
}
}
}
以上就是所有注册过程,现在再来看这张图就会特别清晰EventBus的register()过程了: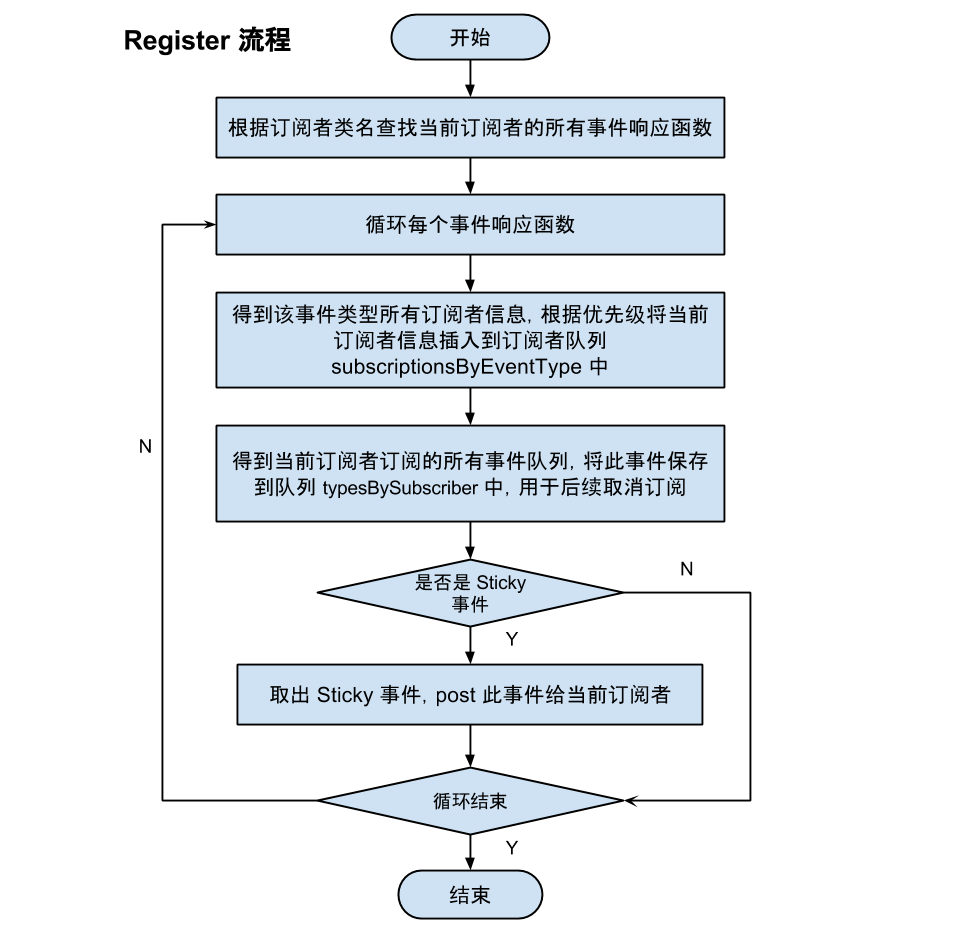
4.3事件分发过程源码分析
通过第二节我们知道可以通过EventBus.getDefault().post("str");来发送一个事件,所以我们就从这行代码开始分析,首先看看post()方法是如何实现的:
1 | public void post(Object event) { |
首先是通过currentPostingThreadState.get()方法来得到当前线程PostingThreadState的对象,为什么是说当前线程我们来看看currentPostingThreadState的实现:
1 | private final ThreadLocal<PostingThreadState> currentPostingThreadState = new ThreadLocal<PostingThreadState>() { |
currentPostingThreadState的实现是一个包含了PostingThreadState的ThreadLocal对象,关于ThreadLocal
张涛的这篇文章解释的很好:ThreadLocal 是一个线程内部的数据存储类,通过它可以在指定的线程中存储数据,
而这段数据是不会与其他线程共享的。其内部原理是通过生成一个它包裹的泛型对象的数组,在不同的线程会有不同的数组索引值,通过这样就可以做到每个线程通过
get() 方法获取的时候,取到的只能是自己线程所对应的数据。 所以这里取到的就是每个线程的PostingThreadState状态.接下来我们来看postSingleEvent()
方法:
1 | private void postSingleEvent(Object event, PostingThreadState postingState) throws Error { |
跟着上面的代码的注释,我们可以很清楚的发现是在postSingleEventForEventType()方法里去进行事件的分发,代码如下:
1 | private boolean postSingleEventForEventType(Object event, PostingThreadState postingState, Class<?> eventClass) { |
总结上面的代码就是,首先从subscriptionsByEventType里获得所有订阅了这个事件的Subscription列表,然后在通过postToSubscription()方法来分发
事件,在postToSubscription()通过不同的threadMode在不同的线程里invoke()订阅者的方法,ThreadMode共有四类:
PostThread:默认的 ThreadMode,表示在执行 Post 操作的线程直接调用订阅者的事件响应方法,不论该线程是否为主线程(UI 线程)。当该线程为主线程时,响应方法中不能有耗时操作,否则有卡主线程的风险。适用场景:对于是否在主线程执行无要求,但若 Post 线程为主线程,不能耗时的操作;MainThread:在主线程中执行响应方法。如果发布线程就是主线程,则直接调用订阅者的事件响应方法,否则通过主线程的 Handler 发送消息在主线程中处理——调用订阅者的事件响应函数。显然,MainThread类的方法也不能有耗时操作,以避免卡主线程。适用场景:必须在主线程执行的操作;BackgroundThread:在后台线程中执行响应方法。如果发布线程不是主线程,则直接调用订阅者的事件响应函数,否则启动唯一的后台线程去处理。由于后台线程是唯一的,当事件超过一个的时候,它们会被放在队列中依次执行,因此该类响应方法虽然没有PostThread类和MainThread类方法对性能敏感,但最好不要有重度耗时的操作或太频繁的轻度耗时操作,以造成其他操作等待。适用场景:操作轻微耗时且不会过于频繁,即一般的耗时操作都可以放在这里;Async:不论发布线程是否为主线程,都使用一个空闲线程来处理。和BackgroundThread不同的是,Async类的所有线程是相互独立的,因此不会出现卡线程的问题。适用场景:长耗时操作,例如网络访问。
引用自
这里我们只来看看invokeSubscriber(subscription, event);是如何实现的,关于不同线程的Poster的使用可以参考这篇文章
以及上面codekk的文章.invokeSubscriber(subscription, event);代码如下:
1 | void invokeSubscriber(Subscription subscription, Object event) { |
实际上就是通过反射调用了订阅者的订阅函数并把event对象作为参数传入.至此post()流程就结束了,整体流程图如下: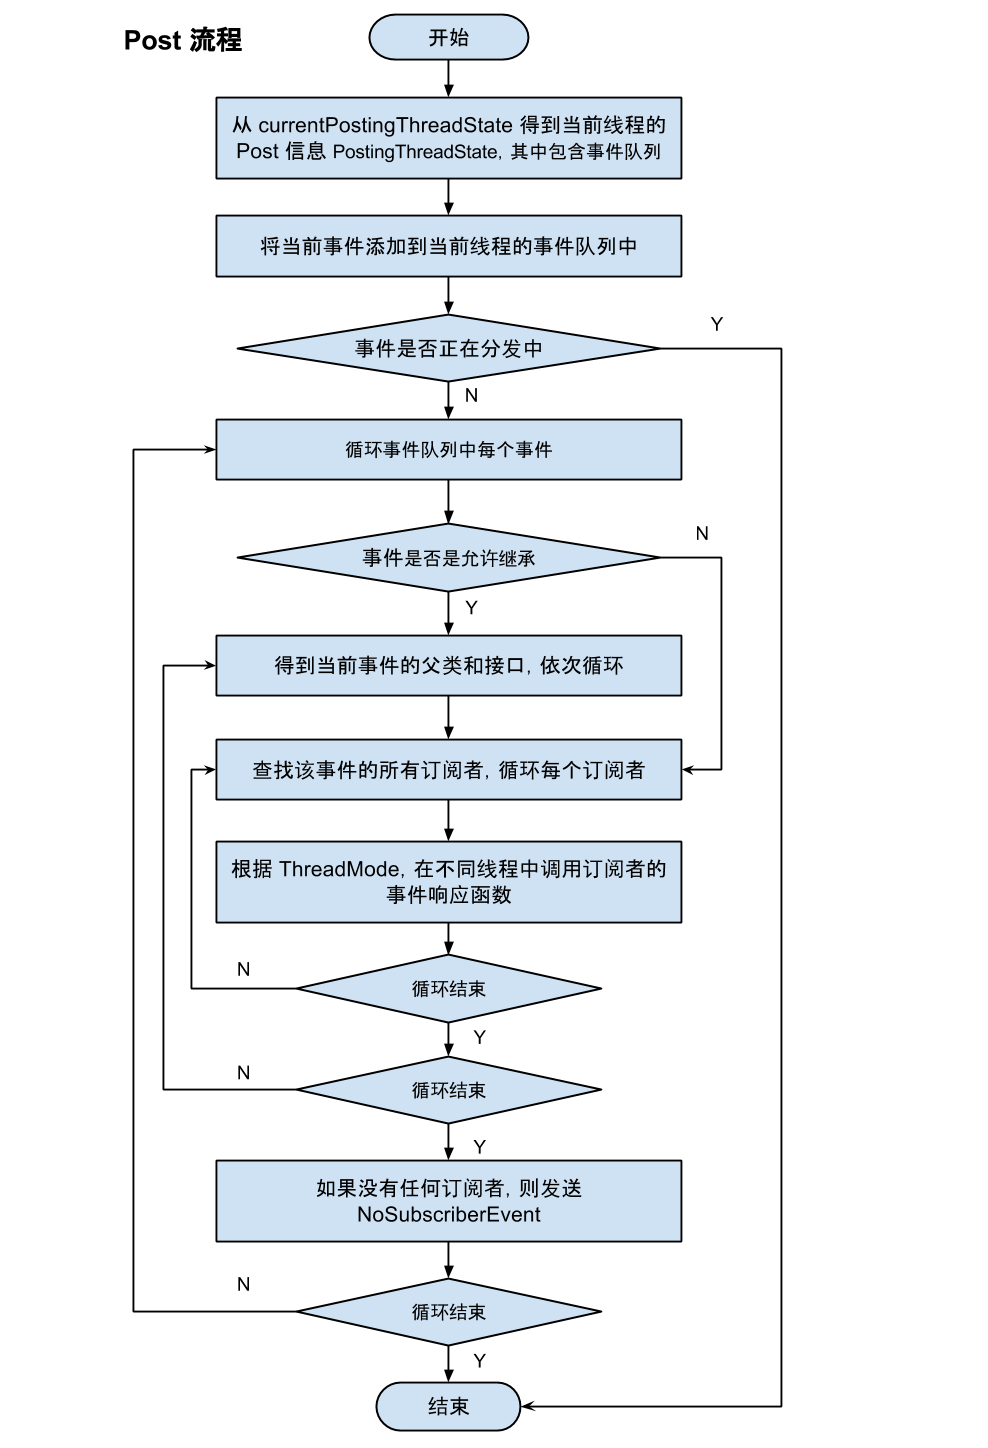
4.4解除注册源码分析
看完了上面的分析,解除注册就相对容易了,解除注册只要调用unregister()方法即可,实现如下:1
2
3
4
5
6
7
8
9
10
11
12
13
14public synchronized void unregister(Object subscriber) {
//通过typesBySubscriber来取出这个subscriber订阅者订阅的事件类型,
List<Class<?>> subscribedTypes = typesBySubscriber.get(subscriber);
if (subscribedTypes != null) {
//分别解除每个订阅了的事件类型
for (Class<?> eventType : subscribedTypes) {
unsubscribeByEventType(subscriber, eventType);
}
//从typesBySubscriber移除subscriber
typesBySubscriber.remove(subscriber);
} else {
Log.w(TAG, "Subscriber to unregister was not registered before: " + subscriber.getClass());
}
}
然后接着看unsubscribeByEventType()方法的实现:1
2
3
4
5
6
7
8
9
10
11
12
13
14
15
16
17private void unsubscribeByEventType(Object subscriber, Class<?> eventType) {
//subscriptionsByEventType里拿出这个事件类型的订阅者列表.
List<Subscription> subscriptions = subscriptionsByEventType.get(eventType);
if (subscriptions != null) {
int size = subscriptions.size();
//取消订阅
for (int i = 0; i < size; i++) {
Subscription subscription = subscriptions.get(i);
if (subscription.subscriber == subscriber) {
subscription.active = false;
subscriptions.remove(i);
i--;
size--;
}
}
}
}
最终分别从typesBySubscriber和subscriptions里分别移除订阅者以及相关信息即可.
5.设计模式
观察者模式
观察者模式观察者模式是对象的行为模式,又叫发布-订阅(Publish/Subscribe)模式、模型-视图(Model/View)模式、源-监听器(Source/Listener)模式或从属者(Dependents)模式。观察者模式定义了一种一对多的依赖关系,让多个观察者对象同时监听某一个主题对象。这个主题对象在状态上发生变化时,会通知所有观察者对象,使它们能够自动更新自己。EventBus并不是标准的观察者模式的实现,但是它的整体就是一个发布/订阅框架,也拥有观察者模式的优点,比如:发布者和订阅者的解耦.
6.个人评价
EventBus不论从使用方式和实现方式上都是非常值得我们学习的开源项目,我参与的一些项目里都是广泛的使用EventBus做消息的通知,可以说是目前消息通知里最好用
的项目.但是业内对EventBus的主要争论点是在于EventBus使用反射会出现性能问题,关于反射的性能问题可以参考这篇文章,
实际上在EventBus里我们可以看到不仅可以使用注解处理器预处理获取订阅信息,EventBus也会将订阅者的方法缓存到METHOD_CACHE里避免重复查找,所以只有在最后invoke()方法的时候会比直接调用多出一些性能损耗,但是这些对于我们移动端来说是完全可以忽略的.所以盲目的说因为性能问题而觉得EventBus不值得使用显然是不
负责任的.在2.x版本里EventBus写出的代码可读性不是太好因为所有订阅方法都是onEvent开头,这样就使代码的可读性降低不少,但是3.0之后我们就不用担心这些了,因为
方法名已经不再需要onEvent开头了。所以总体上来说EventBus还是值得我们在项目中使用的。